Textures and materials in UDK are two seperate things. The texture is mearly a 2D image, which is used as reference by the materials. A material can contain several textures, and give a very realistic look.
To find a material, you need to use the “Content Browser”, which, as the name suggests, allows you to browse all content available for your level. To open the content browser, you can either go to “View > Browser Windows > Content Browser”, or click the content Browser buton in the main UI.
Once the Content Browser is open, you can search for materials and other content at the top of the window. This search tool has various options, which allows you to narrow your search more specifically. For example, you migh search for “Wall” whilst looking for materials, but meshes which match the name may appear, so in order to filter them out, you can tell the software to search only for materials.
After locating your desired mesh, you need to apply it to a mesh. In order to apply a material, you can either drag and drop the material onto the mesh, or select the material, and then right click on the mesh, and click “Apply Material”.
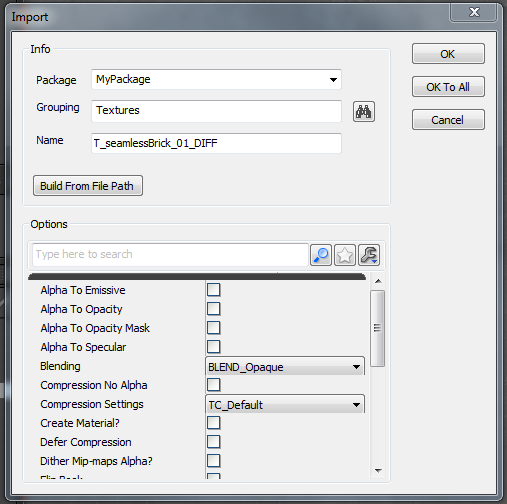
If you wish to use a new material, then you will have to create it yourse,f using textures. To do this, click on the “Import” button at the bottom left of the Content Browser, and select the texture files which you wishThe Import button. to use for the material.

The Import dialog window.
(Note – If you import a normal map texture, then you need to remember to change the “Compression Settings” to TC_Normalmap)
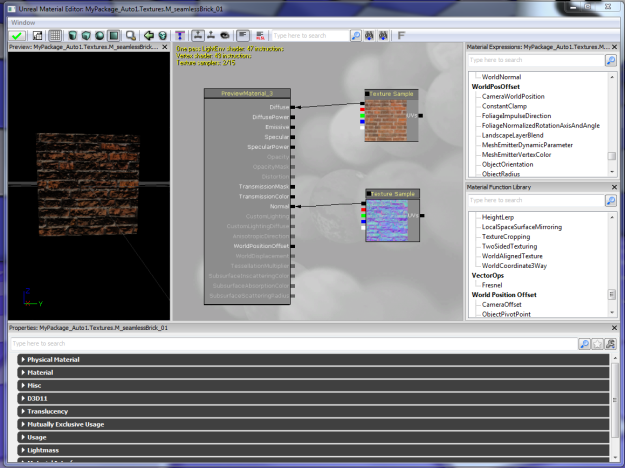
After importing your textures to a suitable place, right click in the Content Browser, and select “New Material”. When the new material has appeared, double click it to open the Material Editor window. Click and drag the imported textures into the material windowso that it looks similar to the picture below.
This picture shows the Diffuse texture, and the Normal Map texture on our material. To make them visible however, we must connect them to the “Master Node”. To do this, simply click and grag the black square on the left of the texture, to the appropriate are on the “Master Node”
After clicking the green tick at the top left of the window, you can close the Material Editor, and apply the material to your level.


